VRC Documentation
Setting your ATIS
On VATSIM, your "ATIS" is the text sent to pilots when they first tune your primary frequency. It is also known as your "Controller Info". Your ATIS can contain a variety of information, depending on your position, but at the very least, it should contain your name and your radio callsign, such as "Boston Center".
Depending on the position you are working, you may want to include some of the following items as well:
- Runway(s) in use at one or more fields
- Weather for one or more fields
- Current ATIS code
- Link to a controller feedback form
- Link to area charts
- Information about events or training in progress
- List of fields you are covering for coordination purposes
Basically, your ATIS should contain any information considered important for pilots flying under your control. Contact the training staff in the area where you will be controlling for specifics. Different areas have varying standards for what information should be contained in your ATIS.
Note that you do not need to include your voice channel URL (via the $mypvtrw or $myrw variables) anymore. VRC takes care of inserting that for you automatically, if you are using voice.
You set your ATIS using VRC's integrated ATISMaker function. If you have ever used the stand-alone version of ATISMaker, then you will be familiar with the interface. See below for details on using ATISMaker from within VRC.
ATIS Variables
Since many of the items you will commonly want in your ATIS change with time, or from one pilot to the next, VRC provides a number of variables which you can insert into your ATIS text. When a pilot tunes your frequency and requests your ATIS, these variables are replaced with the relevant information. The following table lists all of these variables:
|
ATIS Functions
VRC also provides several functions for inserting information into your ATIS. A function differs from a variable in that a function can accept a parameter to alter the text that is inserted in place of the function. The following table lists all of the functions available when constructing your ATIS:
|
ATISMaker
VRC includes an integrated version of ATISMaker, which is a tool to help ASRC users manage their ATIS. The ATISMaker functionality is built into VRC. Throughout the rest of this manual, "ATISMaker" refers to the integrated version, not the stand-alone version, unless otherwise specified. To access ATISMaker, choose "ATISMaker..." from the "Settings" menu. A screen similar to the following will appear:
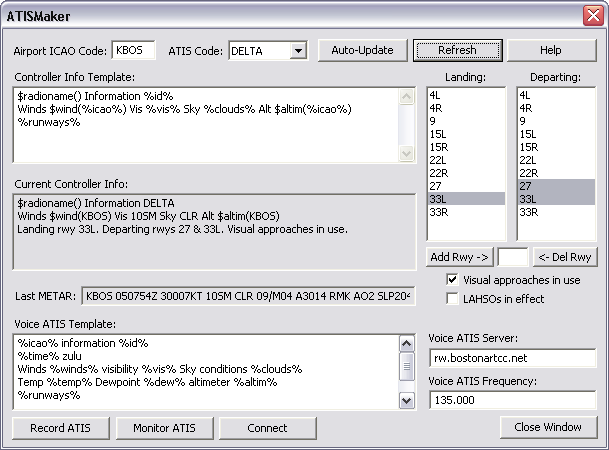
Initially, the Airport ICAO box will be empty, and the runway lists will be empty. You will need to enter the ICAO code for the field where you will be working. You will also need to enter the list of runways. Once you have done this, you should save your profile so that you don't have to repeat the process the next time you work the same field.
To enter runways, enter the runway identifier in the box provided, and press the "Add Rwy ->" button. The runways are added to the list in the order you enter them. If you make a mistake and you want to remove a runway, enter its identifier and press the "<- Del Rwy" button.
The next thing you need to configure is the ATIS Template. The template text is used by ATISMaker to construct your ATIS when required. You can use all of the normal ATIS variables and functions as listed above, plus there are some new variables that only have meaning when used in the ATISMaker template. These variables are listed below:
|
Any of the above variables will be replaced with their actual value whenever ATISMaker generates your ATIS. There are a number of situations which cause ATISMaker to update your ATIS. The first is by manually pressing the "Generate ATIS Now" button. This will cause ATISMaker to fetch the latest METAR for the specified field, insert the appropriate variables into your template, and copy the resulting text to your actual ATIS which will be sent to pilots.
Your ATIS is also updated by ATISMaker when you manually choose a new ATIS identifier from the "ATIS code" dropdown list.
Finally, your ATIS will also be updated if you place ATISMaker in "Auto" mode and a new METAR is received by VRC. (VRC checks for new METARs every five minutes.) To place ATISMaker in Auto mode, press the "Auto" button. The button will remain depressed while in Auto mode. If a new METAR is recieved, ATISMaker will automatically switch to the next ATIS identifier and update your ATIS. The ATIS identifier will flash in the Button Bar to alert you that a new ATIS is available.
Note that any time you place ATISMaker in Auto mode, or manually choose an ATIS identifier from the dropdown list, the current ATIS identifier will be shown in the Button Bar on the Primary Display.
Selecting the Active Runways
If you use the %runways% variable in your template, ATISMaker will build a sentence listing the selected arrival and departure runways and insert it into the template in place of the %runways% variable. To select the active runways, simply click on the runway identifier in the appropriate list. The entry will be highlighted in gray if it is selected. As an example, in the above screenshot, runway 33L is active for arrivals, and runway 15R is active for departures. This would cause ATISMaker to replace %runways% with "Landing rwy 33L. Departing rwy 15R." in your template. Experiment with different combinations of active runways to learn how the information is portrayed in your ATIS.
Other ATISMaker Settings
ATISMaker also provides checkboxes which allow you to indicate whether or not visual approaches are in use, and whether or not Land And Hold Short Operations (LAHSOs) are in effect. If you check these boxes, ATISMaker will add text to the list of active runways in order to pass on the information to pilots. Experiment with checking these boxes to see the effect on your ATIS.
Remember to save your profile when you are done working with ATISMaker.
Voice ATIS
Starting with version 1.2, VRC supports the ability to provide your ATIS information as an audio recording, just like real-world ATISes.
To create a voice ATIS, you must first create a Voice ATIS template. The template box is shown on the ATISMaker window just below the "Last METAR" box. Default Voice ATIS template text is provided if you have not previously configured it. You use all the same variables and functions as you use for creating your regular Controller Info template.
When you are ready to record your voice ATIS message, press the "Record ATIS button". A window will be shown containing your voice ATIS template with all the variables filled in:
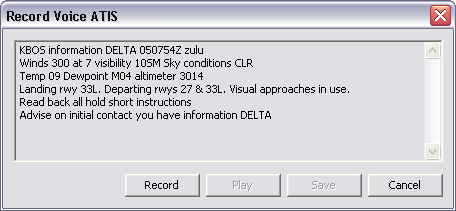
This text is called the Voice ATIS "script". Review the script to make sure the information is correct, then press the "Record" button and begin speaking. Leave a few seconds of silence at the end of your message before pressing the Record button again to stop the recording.
Next, press the "Play" button to listen to your recording. Press the play button again to stop the playback. If you wish to re-record the message, press the Record button again. Your previous recording will be overwritten. Once you are happy with the recording, press the "Save" button. If you decide not to record a new voice ATIS message, press the "Cancel" button.
After saving your recording, you can then connect your voice ATIS to the VATSIM network. First, be sure to enter the appropriate server address in the "Voice ATIS Server" box. Your local instructional staff will tell you what to use here. Also, enter the correct radio frequency for the airport in the "Voice ATIS Frequency" box. This frequency can usually be found on airport diagrams or other charts.
When you are ready to connect your voice ATIS, press the "Connect" button. The button will be temporarily disabled while the connection is made. Once the connection is created, the Connect button will be changed to read "Disconnect". Press the Disconnect button to disconnect your voice ATIS from the network.
If the conection is made successfully, you will see a new entry in your Controller List representing your voice ATIS. For example, if you are creating a voice ATIS for KBOS, you will see "KBOS_ATIS" appear in the controller list. This is your voice ATIS connection. It appears on the network as a separate "controller" with its own primary frequency and voice channel. Pilots will see this entry in their list of in-range controllers once they are within radio range of your airfield. If a pilot tunes your voice ATIS frequency, they will hear your message looped repeatedly until they tune a different frequency. Note that VRC only transmits your recording to the voice server if there is at least one pilot listening in on the frequency.
During your session, when the weather changes, you will need to update your voice ATIS message. You can do so at any time, even if you already have an active voice ATIS connection. Your existing voice ATIS recording will remain in effect while you are recording the new message. The new recording will replace the current one once you press the Save button on the recording window.
After recording and saving your message, you can listen to it by pressing the "Monitor ATIS" button on the ATISMaker window. Press the same button again to stop monitoring the recording.
While you have an active voice ATIS connection, a small green "v" will appear in the ATIS button in your button bar. If for any reason the voice server connection fails, the v will turn red and begin blinking. If this happens, disconnect your voice ATIS and check the voice server address in the ATISMaker window.
Note that the voice ATIS script also serves as the text version of your voice ATIS. This text will be shown to pilots when they tune your ATIS frequency. Your regular Controller Info (described at the beginning of this page) is still maintained separately using the Controller Info Template. Your controller Info will be displayed to pilots when they tune your primary frequency, and your voice ATIS script will be shown to pilots when they tune your voice ATIS frequency.