VRC Documentation
Configuring VRC (General Settings)
Most of the VRC configuration settings can be found in the General Settings window. You access this window by selecting "General..." from the "Settings" menu on the Primary Display. Starting with version 1.2, the General Settings window consists of a collection of tabbed pages, each of which contain a group of related configuration options. Each tab is described below:
Miscellaneous Tab
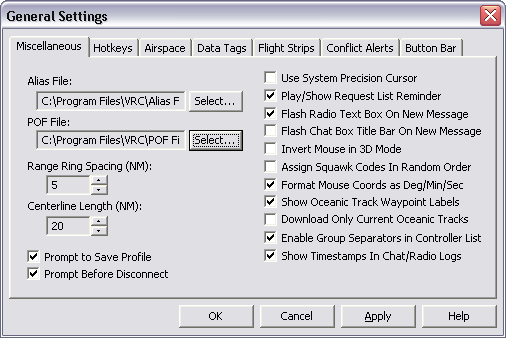
- Alias File
- Press the "Select..." button to the right of the text box in order to select your alias file. Alias files define command shortcuts which you will enter in the command line when working with pilots via text. Consult the training staff for the area where you will be controlling in order to obtain the appropriate alias file.
- POF File
- Press the "Select..." button to the right of the text box in order to select your POF file. A POF file defines all the ATC sectors in and around the area where you are controlling. The information in the file defines, among other things, the tag shown in ARTS mode, the two-character ID shown in the controller list for each controller, and the various sector "Radio Names". Consult the training staff for the area where you will be controlling in order to obtain the appropriate POF file.
- Range Ring Spacing
- This sets the distance in nautical miles between the range rings drawn on the scope. See "Configuring the Scope" for details on activating the range rings.
- Centerline Length
- This sets the length in nautical miles of runway centerlines drawn on the scope. See "Configuring the Scope" for details on activating the centerlines.
- Prompt to Save Profile
- If this option is checked, you will be prompted before exiting VRC or loading a new profile if you have made changes to the current profile without saving them.
- Prompt Before Disconnect
- If this option is checked, you will be prompted before exiting VRC, loading a new profile, or disconnecting from the network if you are currently connected.
- Use System Precision Cursor
- If this option is checked, the "Precision Select" cursor defined in your Windows Mouse control panel will be used instead of the DSR-style cursor (or the ARTS cursor) included with VRC.
- Play/Show Request List Reminder
- If this option is checked, and you have aircraft in your reminder list, every 30 seconds a sound will be played and a message will be shown listing the aircraft that are in your reminder list. The aircraft are also shown in red in your Aircraft List. See "Some Useful Tools" for details on the reminder list.
- Flash Radio Text Box On New Message
- If this option is checked, the radio history box on your Primary Display will flash when new text messages are received from pilots on your primary frequency or on the guard frequency. Click on the radio history area or press CTRL-SPACE to stop the flashing.
- Flash Chat Box Title Bar On New Message
- If this option is checked, the title bar will flash in a chat window when a new message is received for that window. The flashing will stop when you click on the chat window.
- Invert Mouse in 3D Mode
- If this option is checked, the pitch up/down movement sensing for your mouse will be reversed in the 3D radar mode.
- Assign Squawwk Codes In Random Order
- If this option is checked, squawk codes will be assigned to aircraft from your range at random. This can help prevent duplicate squawk code assignments among controllers sharing the same code range.
- Format Mouse Coords as Deg/Min/Sec
- If this option is checked, and you have enabled the display of the mouse location on the View menu, the mouse coordinates will be shown in degrees, minutes, and seconds instead of of in decimal degrees.
- Show Oceanic Track Waypoint Labels
- If this option is checked, labels for each waypoint on an oceanic track will be displayed along with the track route itself.
- Download Only Curernt Oceanic Tracks
- If this option is checked, only those oceanic tracks that are active for the current day will be shown in the Oceanic Tracks window. Otherwise, all recent tracks including those from previous days will be shown.
- Enable Group SEparators in Controller List
- If this option is checked, a separator line will be shown for each grouping of controllers (based on facility type, etc.) in the Controller List.
- Show Timestamps In Chat/Radio Logs
- If this option is checked, a timestamp will be shown for each receieved radio or chat message.
Hotkeys Tab

- Aircraft Select Key
- To set a new Aircraft Select (ASEL) key, click in the box and press the key. The key name will be shown in the box. For details on when the ASEL key is used, see "Selecting Aircraft".
- Controller Select Key
- To set a new Controller Select (CSEL) key, click in the box and press the key. The key name will be shown in the box. For details on when the CSEL key is used, see "Chat Windows".
- Push to Talk Key
- To set a new Push to Talk (PTT) key, click in the box and press the key. The key name will be shown in the box. The PTT key is used for voice transmissions either to pilots or on the land line with other controllers. Select a key which will not be used for any other reason while working in VRC. The left or right CTRL key are good choices.
Airspace Tab

- Target Visibility Range
- This slider sets the range at which you will see targets on your scopes. This value is given in nautical miles from your "visibility center(s)". (See "Configuring the Scope" for details on setting your visibility center(s).) It is important that you keep this slider set as low as possible. The higher your visibility range, the more bandwidth you consume on the network. It should be set to only cover your airspace. If you are working Ground or Clearance Delivery, it should only cover the airport surface area, which would generally mean the minimum setting of 5 miles.
- Arrival and Departure Fields
- These lists determine which aircraft appear on your Aircraft List. These are simple comma or space-separated lists of ICAO codes.
- Transition Altitude
- This setting defines the altitude (in feet) at which VRC will begin to format altitudes in terms of flight levels instead of feet. This also affects the display of altitudes (true versus pressure altitude) in data blocks for aircraft above this transition level. If you are unsure what the transition level is for the area where you intend to control, consult your training staff.
Data Tags Tab
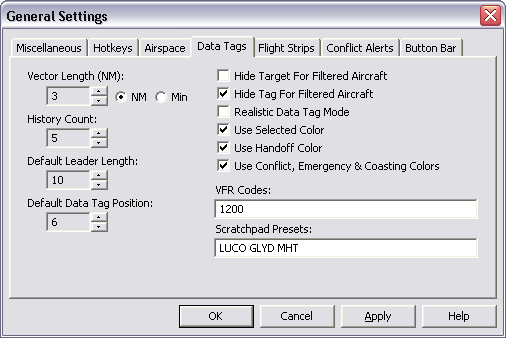
- Vector Length
- In the DSR radar mode, when tracking an aircraft, a vector line will be drawn from the aircraft primary target in the direction of the aircraft's travel. This setting determines the length of the vector line. It is either specified in nautical miles or in minutes, depending on which of the two radio buttons (just below the text box) is selected.
- History Count
- In all radar modes, a history trail for moving aircraft will be drawn. This setting determines how many such history targets are drawn. Set this to zero to disable target histories.
- Leader Length
- This specifies the default length (in pixels) of the leader line drawn between a target and its data block. Note that you can use the mouse to click and drag a data block to a new position, with a different leader length if desired.
- Default Tag Position
- This specifies the default position of a data block for new aircraft. The value corresponds to the position of the number on your numeric keypad. Note that you can reposition data tags by dragging them with the mouse.
- Hide Target For Filtered Aircraft
- If this option is checked, any aircraft outside of your defined airspace (see below) will not have a target symbol drawn.
- Hide Tag For Filtered Aircraft
- If this option is checked, any aircraft outside of your defined airspace (see below) will not have a data tag drawn.
- Realistic Data Tag Mode
- If this option is checked, the Realistic Data Tags mode is enabled. See the Advanced Topics section for more information.
- Use Selected Color
- If this option is checked, the currently radio-selected aircraft target will be drawn in the "Selected" color from the current Color Profile. Otherwise, the target will be drawn using the normal color for unselected aircraft. This option is provided for the purposes of realism.
- Use Handoff Color
- If this option is checked, the target for any aircraft you are handing off to another controller, or for any aircraft being handed off to you will be drawn in the "Handoff" color from the current Color Profile. Otherwise, the target will be drawn using the normal color. This option is provided for the purposes of realism.
- Use Conflict, Emregency & Coasting Colors
- If this option is checked, targets that are currently in any of the listed conditions will use the appropriate color from the current Color Profile. Otherwise the target will be drawn using the normal color. This option is provided for the purposes of realism.
- VFR Codes
- You can specify a set of codes (comma-separated) or even ranges of codes here. Any aircraft squawking a code included in this set will be drawn as a VFR target. Example values: "1200", "1200,1201,1202", "1200-1277,1300-1355,1234".
- Scratchpad Presets
- You can specify a list of preset scratchpad codes here. Separate them with spaces. This list will appear when you right-click a target and choose "Set Scratchpad" from the pop-up menu.
Flight Strips Tab
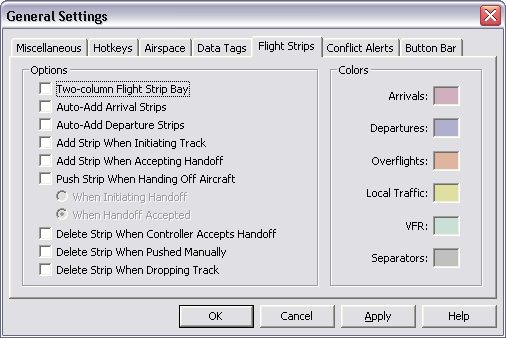
- Two-column Flight Strip Bay
- If this option is checked, the Flight Strip Bay will contain two columns for strips. If this option is unchecked, the Flight Strip Bay will consist of only one column. See "The Flight Strip Bay" to learn how to use the Strip Bay.
- Auto-Add Arrival Strips
- If this option is checked, whenever a flight plan is received for an aircraft which is arriving at a field on your arrival airport list, a flight strip for the aircraft will automatically be added to your Flight Strip Bay. See "The Flight Strip Bay" to learn how to use the Strip Bay.
- Auto-Add Departure Strips
- If this option is checked, whenever a flight plan is received for an aircraft which is departing from a field on your departure airport list, a flight strip for the aircraft will automatically be added to your Flight Strip Bay. See "The Flight Strip Bay" to learn how to use the Strip Bay.
- Add Strip When Initiating Track
- If this option is checked, a flight strip will be added to your Flight Strip Bay whenever you initiate track on an aircraft.
- Add Strip When Accepting Handoff
- If this option is checked, a flight strip will be added to your Flight Strip Bay whenever you accept a handoff of an aircraft.
- Push Strip When Handing Off Aircraft
- If this option is checked, whenever you handoff an aircraft to another controller, you will automatically push a flight strip to the receiving controller. This action can happen either when you initiate the handoff, or when the receiving controller accepts the handoff, depending on the radio button setting here.
- Delete Strip When Controller Accepts Handoff
- If this option is checked, and you handoff an aircraft to another controller, if you have a flight strip for the aircraft you handed off, it will be deleted.
- Delete Strip When Pushed Manually
- If this option is checked, and you push a flight strip to another controller, that strip will be deleted from your Flight Strip Bay.
- Delete Strip When Dropping Track
- If this option is checked, and you drop track on an aircraft, if you have a flight strip for the aircraft, it will be deleted.
- Strip Color Options
- The six color options shown here allow you to determine the background color of various types of flight strips in your Flight Strip Bay.
Conlict Alerts Tab
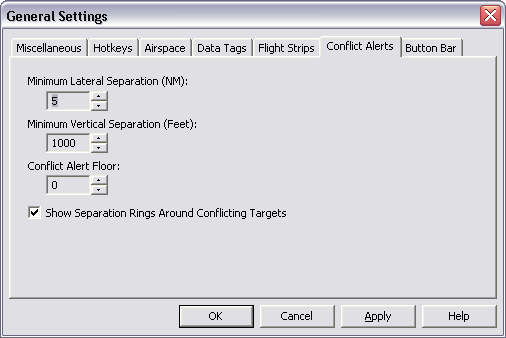
- Minimum Lateral Separation
- This sets the minimum required lateral separation in nautical miles between aircraft before a conflict alert is sounded. Use the buttons to the right of the text box to increase or decrease the value.
- Minimum Vertical Separation
- This sets the minimum required vertical separation in feet between aircraft before a conflict alert is sounded.
- Conflict Alert Floor
- Below this level, no conflicts will be detected. This value is specified in feet.
- Show Separation Rings Around Conflicting Targets
- If this option is checked, a flashing red ring will be drawn around aircraft in conflict. The radius of this ring will be equal to the lateral minimum value set above.
See "Conflict Alerts" for details on how conflict alerts are detected and displayed.
Button Bar Section
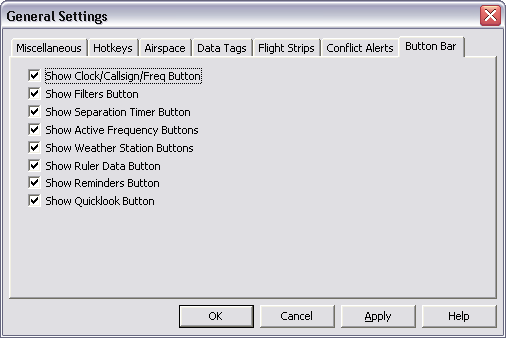
Each checkbox here simply causes the associated button type to be shown or hidden, allowing you to customize which types of buttons appear in the Button Bar on your Primary Display.
Once you have made any changes to the setting in the General Settings window, press the "Apply" button to activate the changes. The General Settings window will remain open, allowing you to make further changes if necessary. If you wish to save your changes and close the General Settings window, press the "OK" button. If you wish to cancel your changes and stay with the previous settings, press the "Cancel" button.
Important: changes to items in the General Settings window will not be saved in your session profile until you choose "Save Session Profile" from the "File" menu. Until then, they will only take effect during the current VRC session. This applies to all other configuration items as well.